Virtue Agent Gateway
The Virtue Agent Gateway dashboard is a real-time platform for systematically managing and analyzing the guardrail activities of AI agents. It supports connecting to third-party MCPs and creating unified gateways for streamlined MCP access, management, and security compliance. It integrates the following three product features for agent guardrails:
It also enables the observability of agent execution trajectories and guardrail activities.
- MCPGuard: Automatically scan the source code and tool descriptions of MCPs in use and flag security vulnerabilities and tool poisoning (prompt injection)
- Access Control: Control the users' privilege to tool calls and data sources when using agents; enable access rule configuration for different user groups
- ActionGuard: Monitor and block the malicious actions of the agent during run-time executions, following given policies; enabling policy configuration
On the VirtueAgent dashboard, you can use the left sidebar to navigate between MCP Servers, Gateway, MCP Guard, Action Guard, Access Control, and Trajectories.
Deployment
We provide SaaS and on-premise deployment options for our Agent Gateway. For SaaS deployment, we will provide a hosted endpoint for dashboard and you can use all our functionality from the dashboard. For on-premise deployment, users can deploy the VirtueGuard platform easily using Docker containers, where users can integrate their own database.
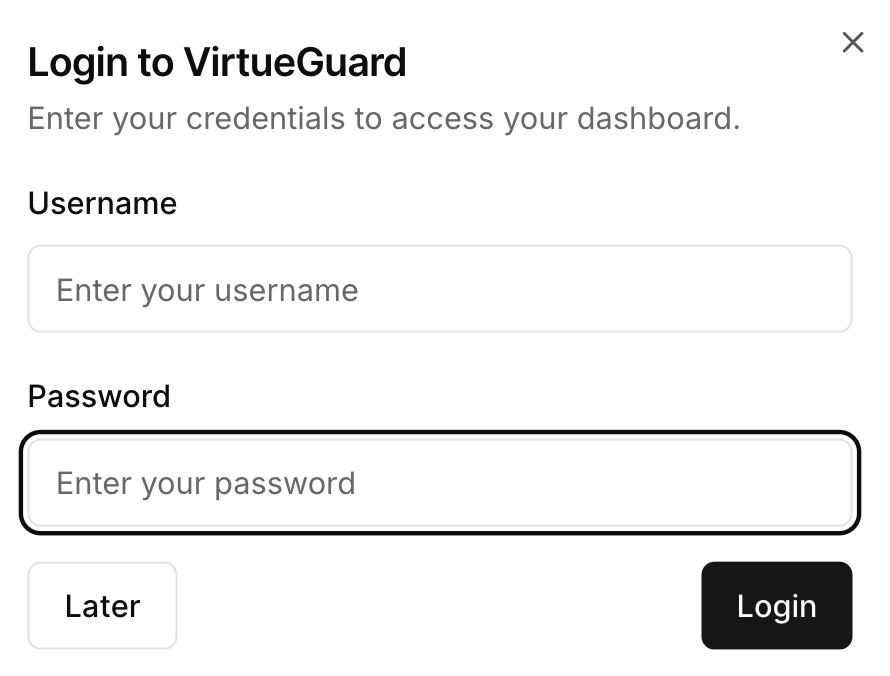
User Login
The dashboard entry point guides users through the registration or login flow:
- New users contact Virtue AI admin for registering accounts to our platform.
- Upon successful registration, users can log in with their unique username and password.
Connect to MCP Servers
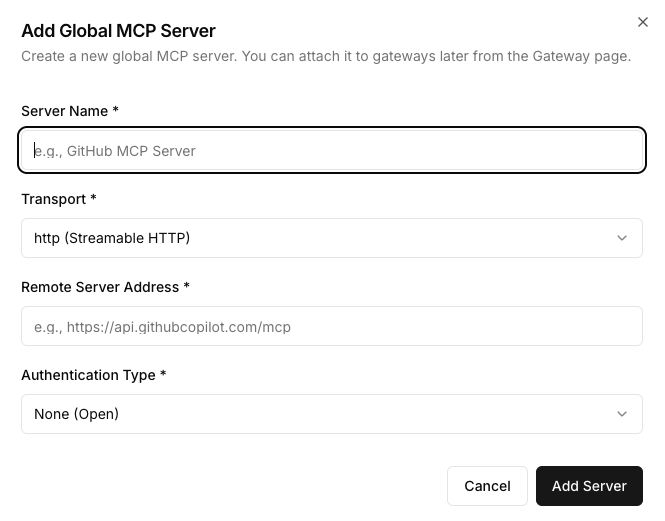
After logging into the platform, users can first connect their own MCPs or third-party MCPs that they want to use to our platform. We support both MCPs require standard OAuth2.0 authentication and MCPs that do not require authentication. To connect an MCP, users can navigate to the "MCP Servers" tab and click on "Add MCP" button. User can type in the required fields to connect an MCP. We support three types of connection: http, sse, and stdio. For http and sse, we support OAuth2.0 authentication. For stdio, no authentication is needed.
Important: Do not include
/ssewhen choosing http transport.
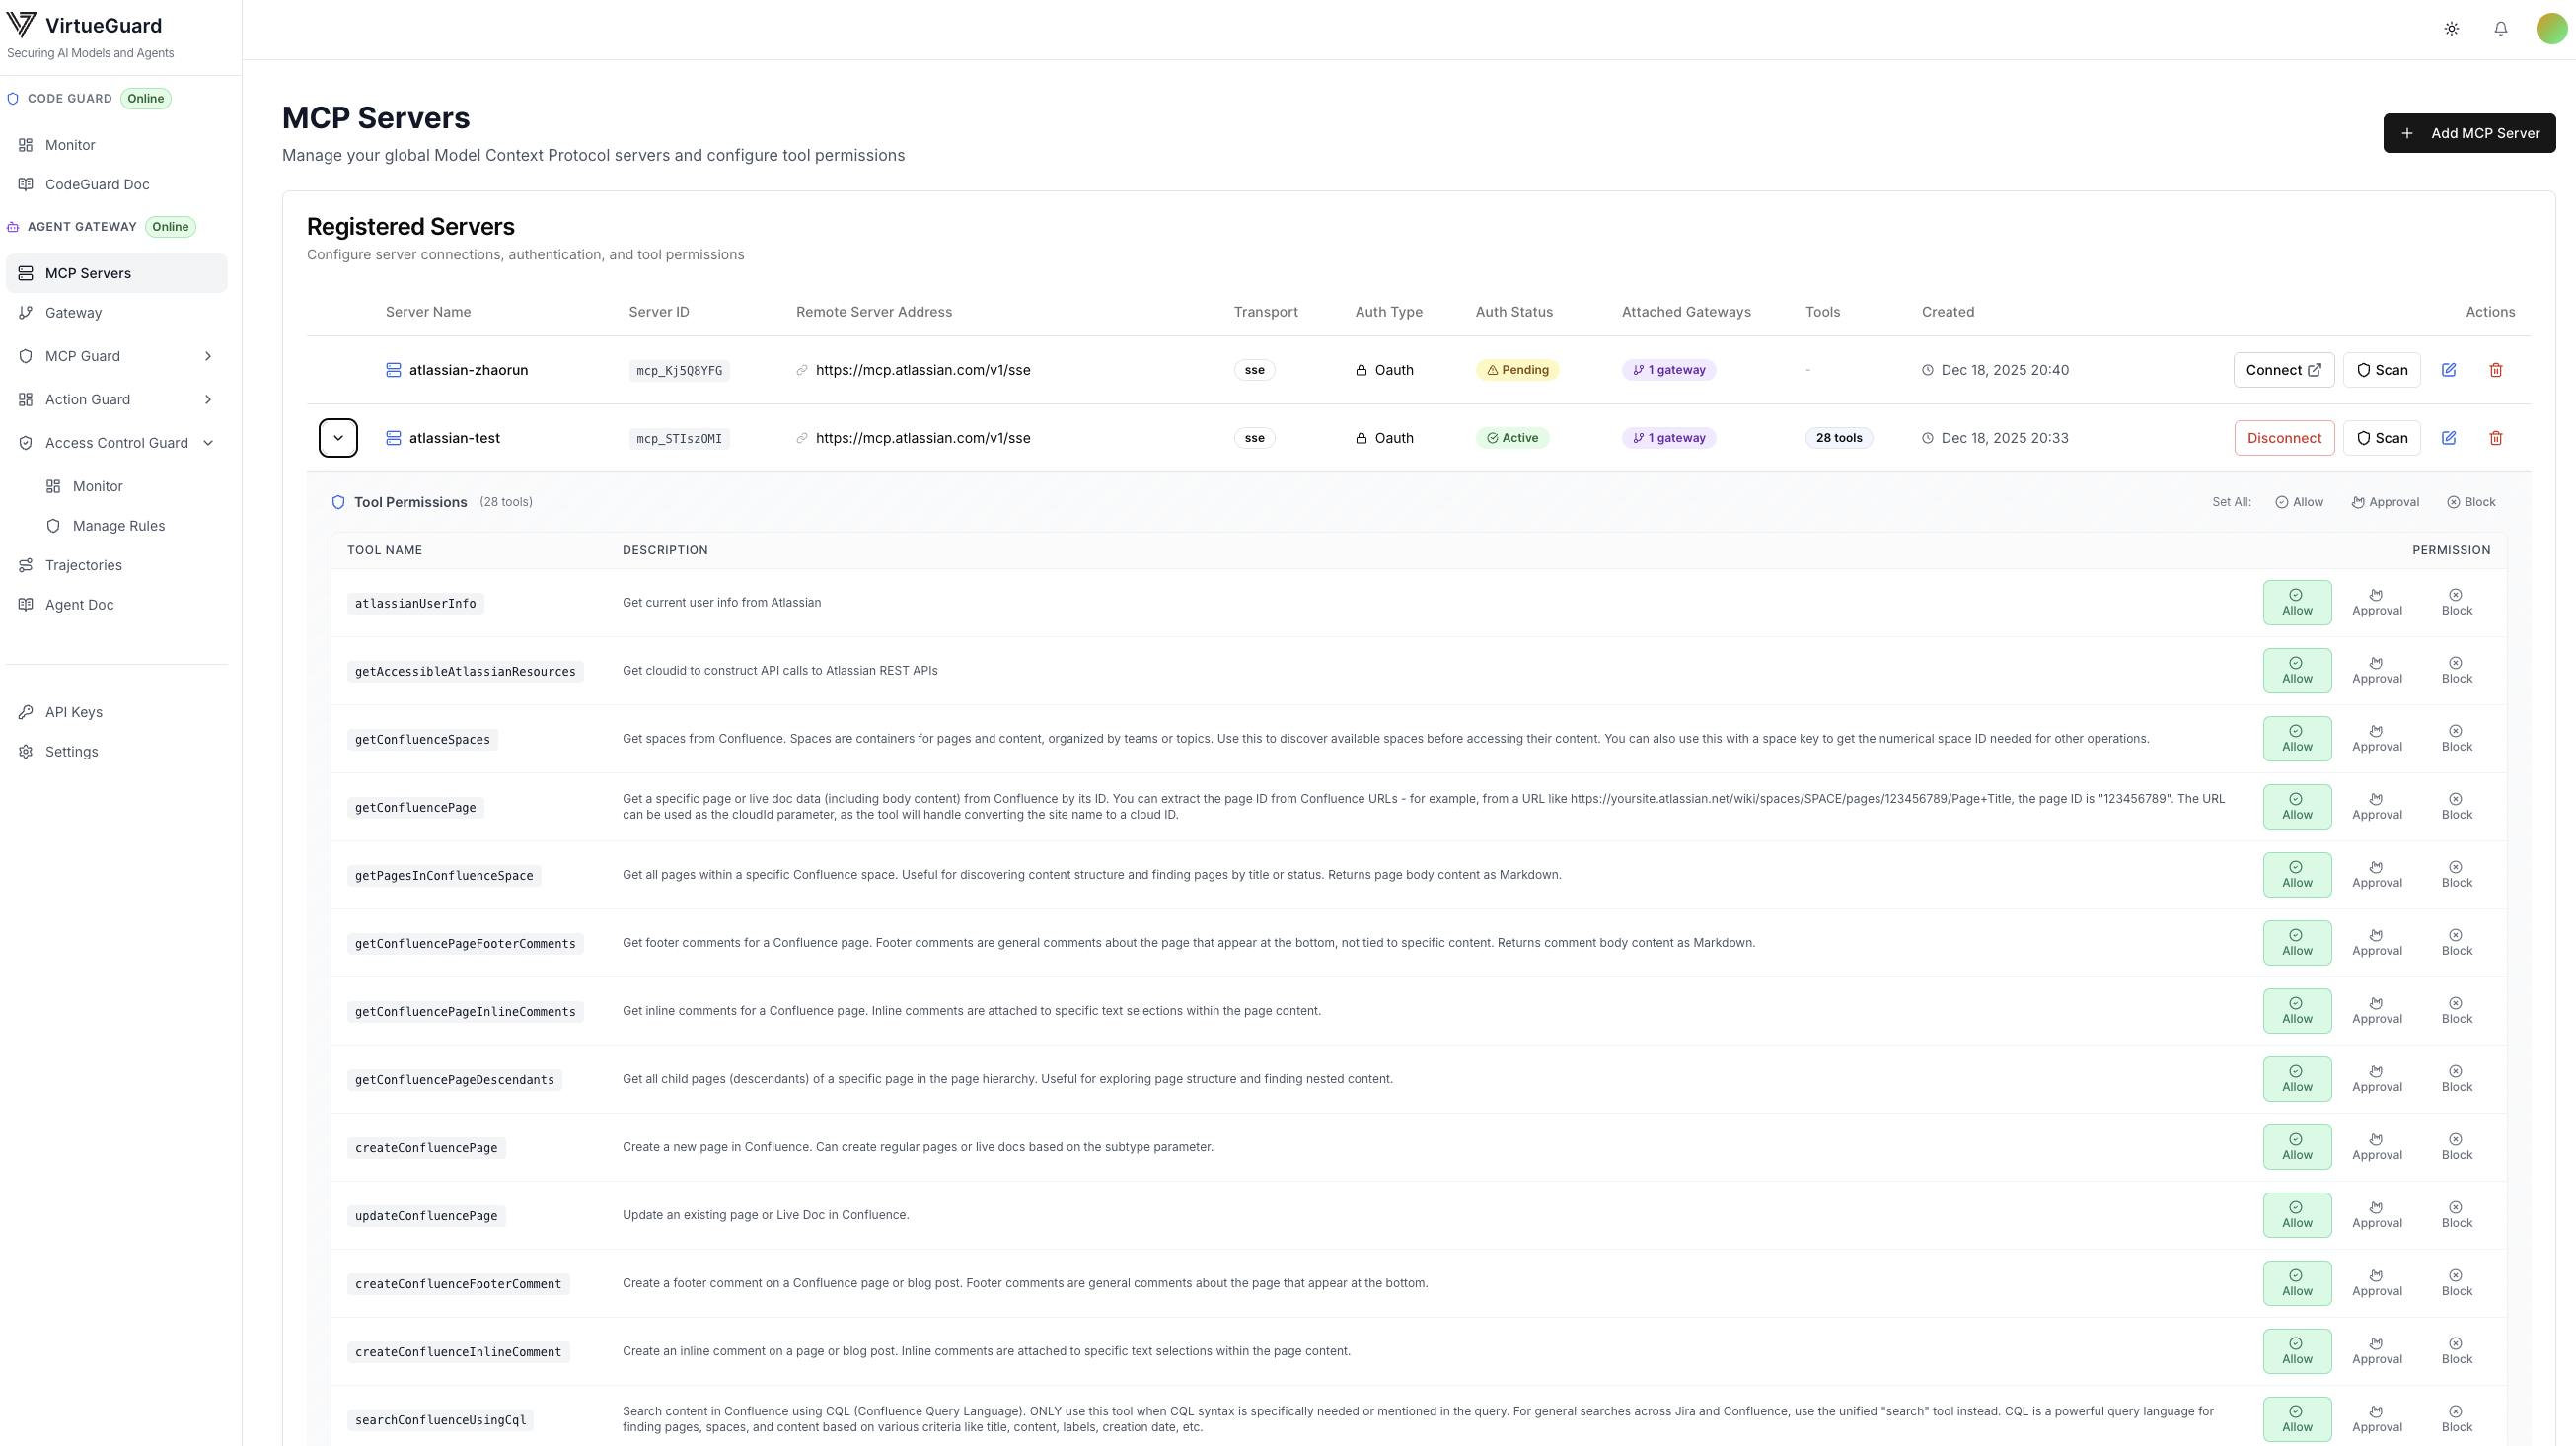
Once connected, the MCPs will be shown on our dashboard. For MCPs that do not require authentication, their tools will be directly shown in the details. For MCPs that require authentication, users need to complete the authentication process by clicking the "connect" button to connect the MCPs and access their tools. We also support tool-level permission control with three permissions: always allow, Approval (ask for user approval), and block. Each MCP will also show the gateways it attached to.
Example: Connect to Atlassian MCP Server
This example demonstrates how to connect to the Atlassian MCP server, which provides access to Jira and Confluence tools. The Atlassian MCP server uses OAuth authentication with dynamic client registration, so you don't need to configure OAuth credentials manually.
Prerequisites: Configure Atlassian Rovo MCP Server Domains
Before connecting to the Atlassian MCP server, you need to allowlist the VirtueAI gateway domain in your Atlassian admin settings:
- Go to your Atlassian Admin Console at admin.atlassian.com
- Navigate to Apps → AI settings → Rovo MCP server
- Click Add domain
- Enter the gateway domain:
https://agentgateway1.virtueai.io/** - Save the configuration
Note: This step is required for OAuth authentication. The Atlassian MCP server will only accept OAuth requests from allowlisted domains.
Step 1: Add the Atlassian MCP Server
- Navigate to the MCP Servers tab and click Add MCP Server
- Enter a name for the server (e.g., "Atlassian MCP")
- Set Transport to sse (Server-Sent Events)
- Enter the Remote Server Address:
https://mcp.atlassian.com/v1/sse - Set Authentication Type to OAuth
- Leave the OAuth Configuration fields empty (Atlassian supports dynamic client registration)
- Click Add Server
Step 2: Authenticate with Atlassian
- After adding the server, you'll see it in the MCP Servers list with status "Pending"
- Click the Connect button next to the server
- A popup will appear asking you to authorize the connection
- You'll be redirected to Atlassian's login page - sign in with your Atlassian account
- Grant the requested permissions to allow access to your Jira and Confluence data
- After successful authentication, you'll be redirected back and the server status will change to "Active"
Step 3: Explore Available Tools
Once connected, click the expand arrow next to the server to view available tools. The Atlassian MCP server typically provides tools for:
- Jira: Create issues, search issues, update issue status, add comments, etc.
- Confluence: Search pages, create pages, update content, etc.
You can configure tool-level permissions (Allow, Approval, Block) for each tool based on your security requirements.
Create Gateways
Once connecting to all MCPs, users can create a Gateway to manage MCPs effectively. To create a Gateway, navigate to the "Gateway" tab, click on the "Create Gateway" button, and type in the gateway name. Once the gateway is created, it will show in the dashboard.
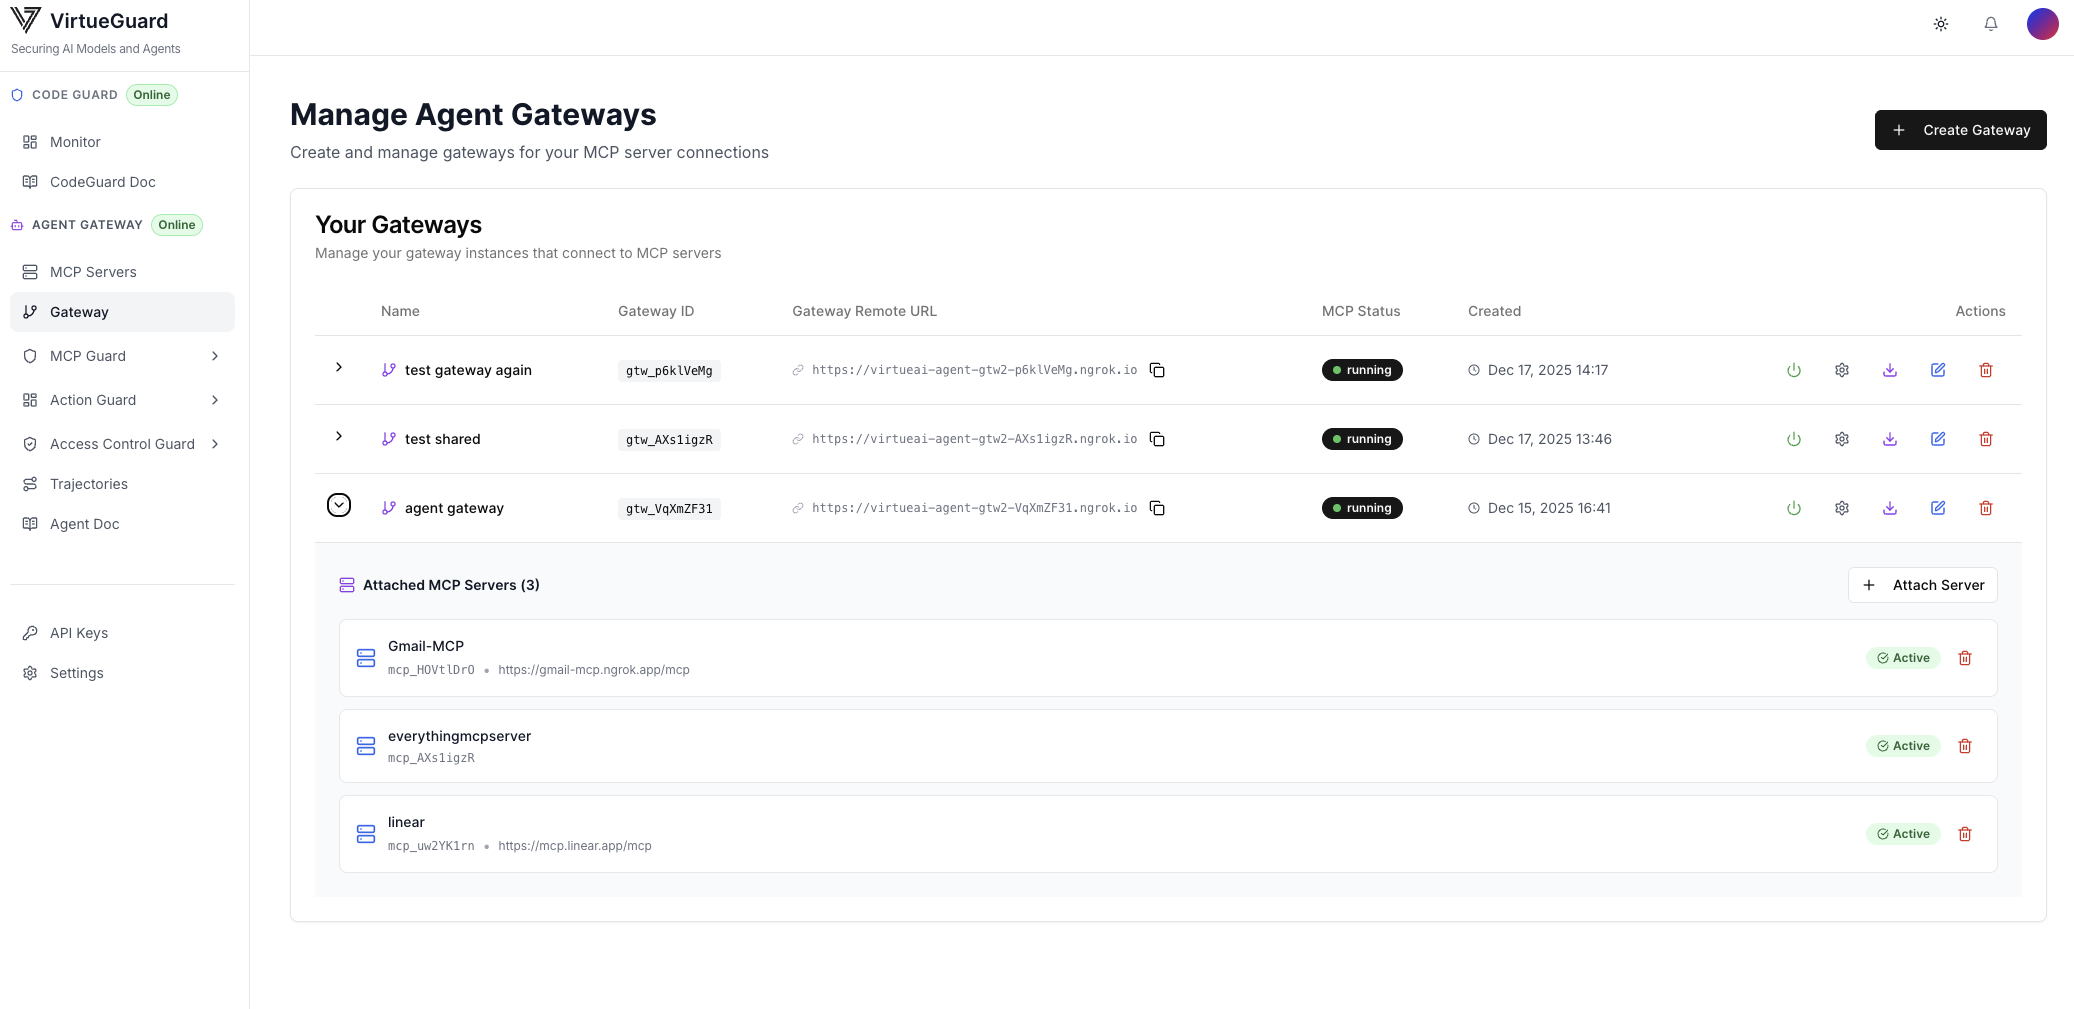
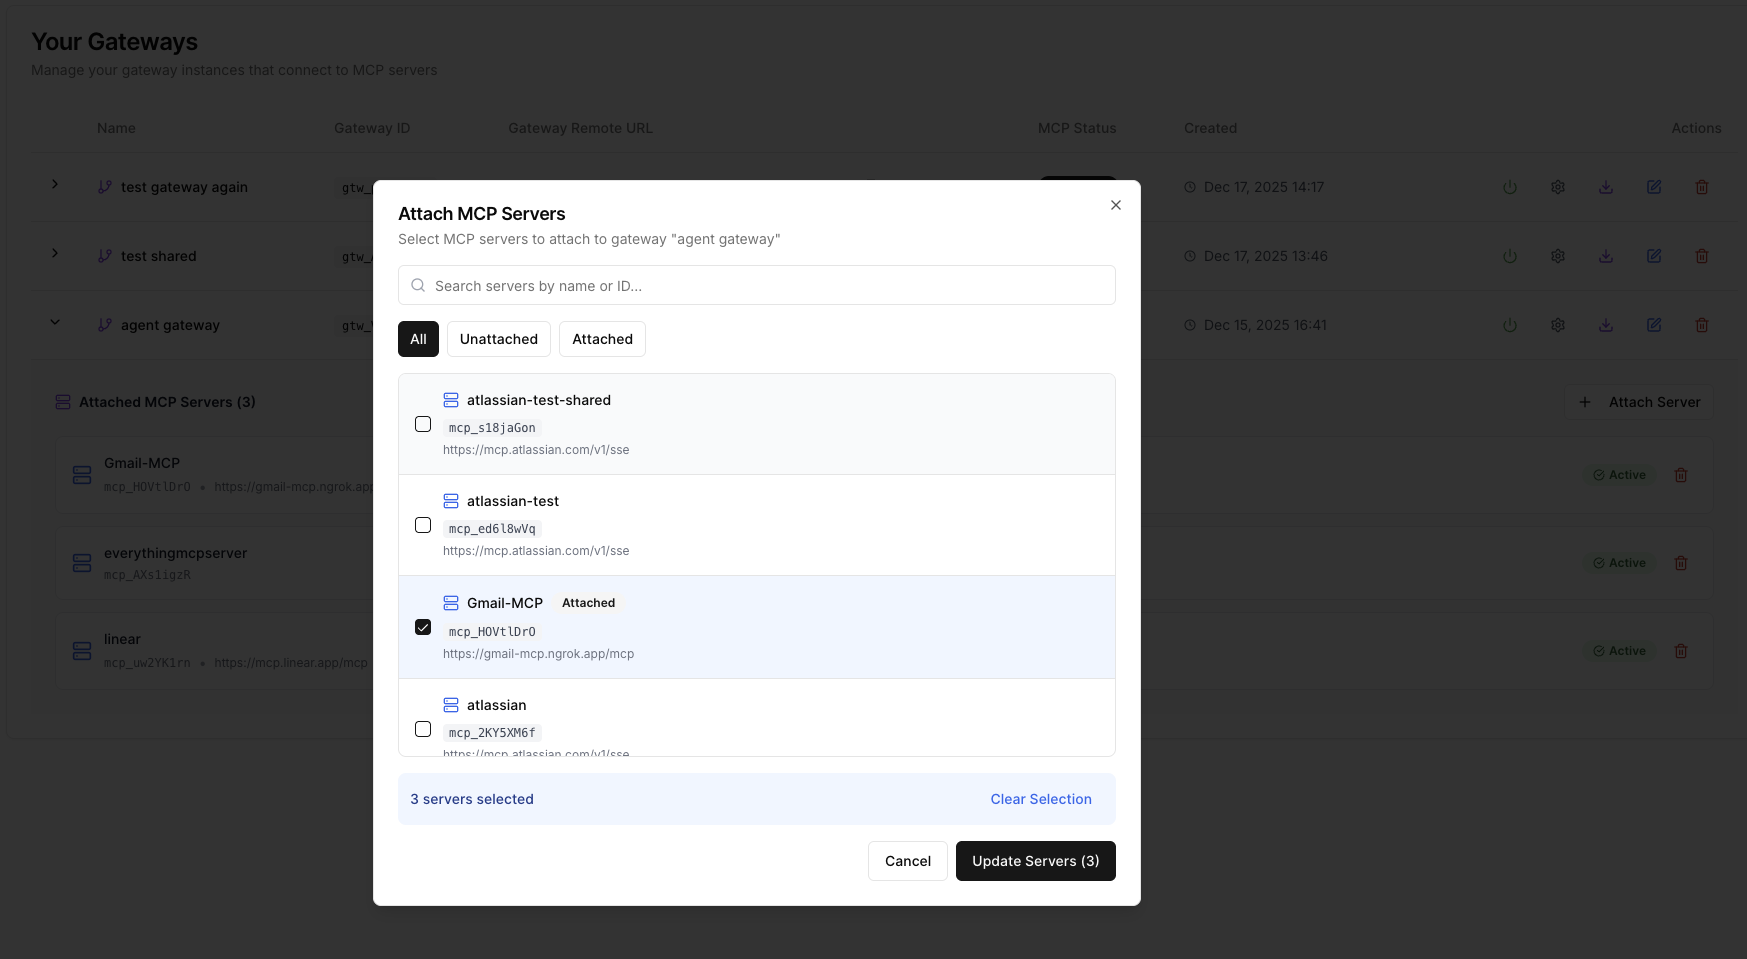
The next step is to attach the needed MCPs to the created Gateway. To do so, select the created Gateway, click on "Attach Server", select the MCPs to attach to the Gateway, and click "Update Servers".
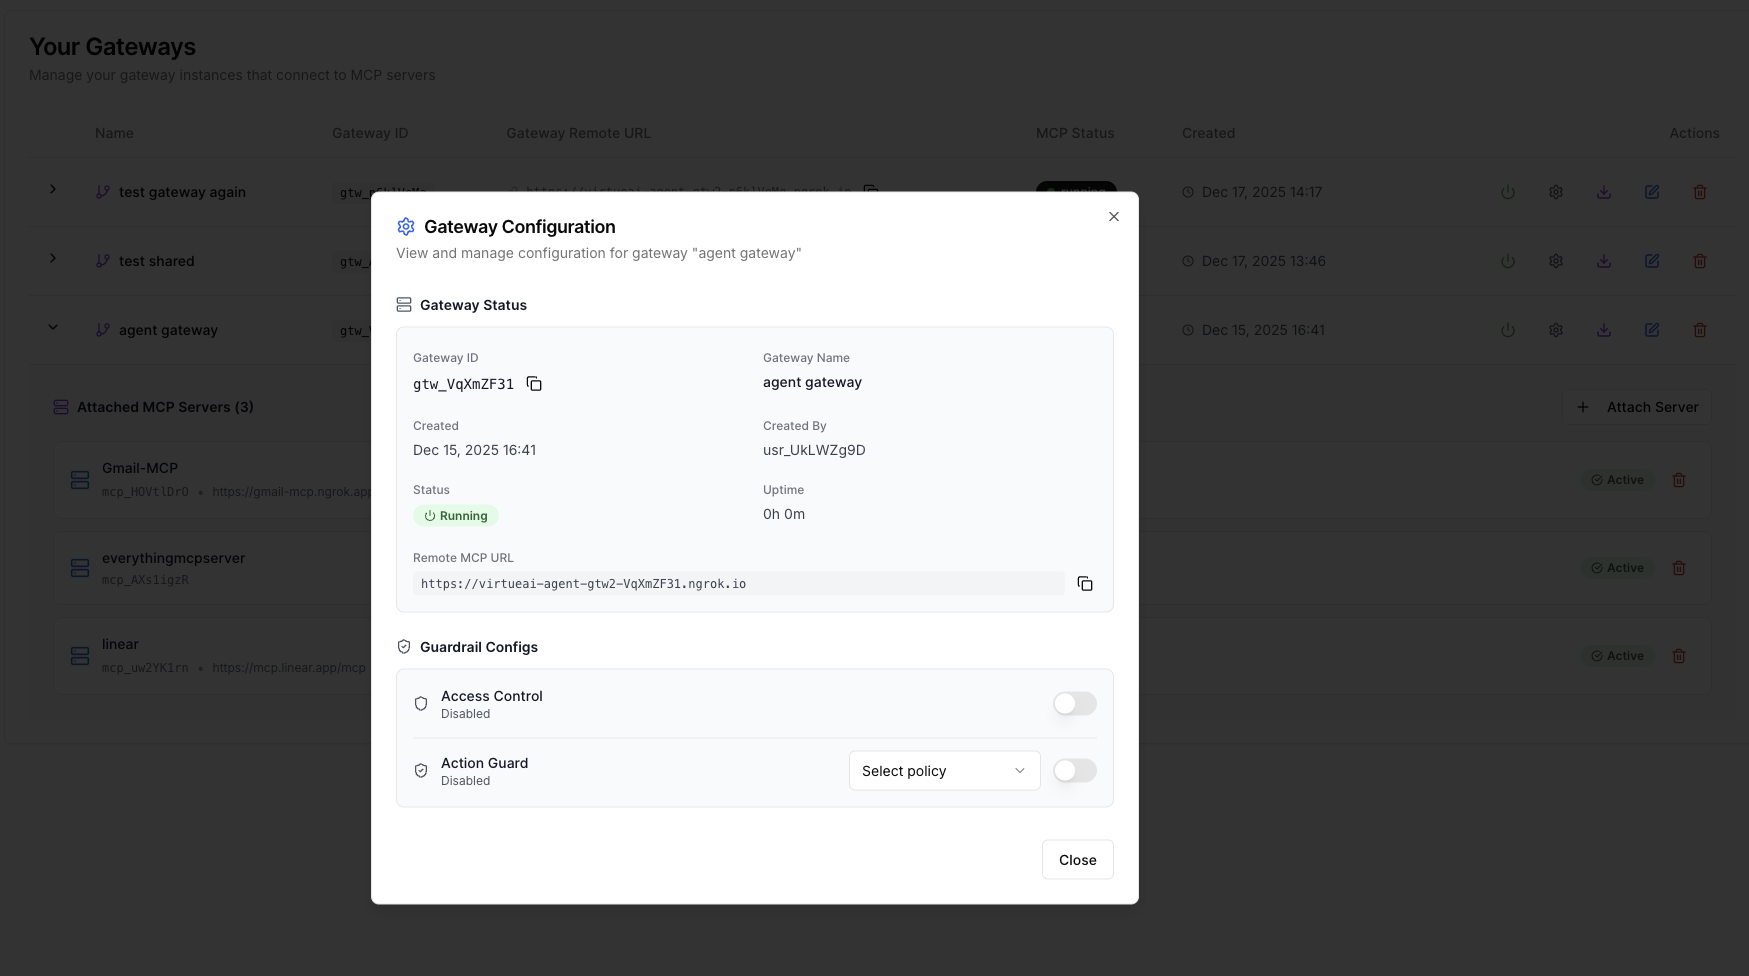
The user can configure our Virtue guardrail function for the selected Gateway by clicking the setting icon (Second button on the right-hand side). User can choose to use Action Guard and/or Access Control for the Gateway. To use Action Guard, user also needs to configure the policy first (See Action Guard for more details).
Finally, click the start button to start the Gateway service (First button on the right-hand side). You will see the status of the gateway changes to "Running" after the service is started successfully.
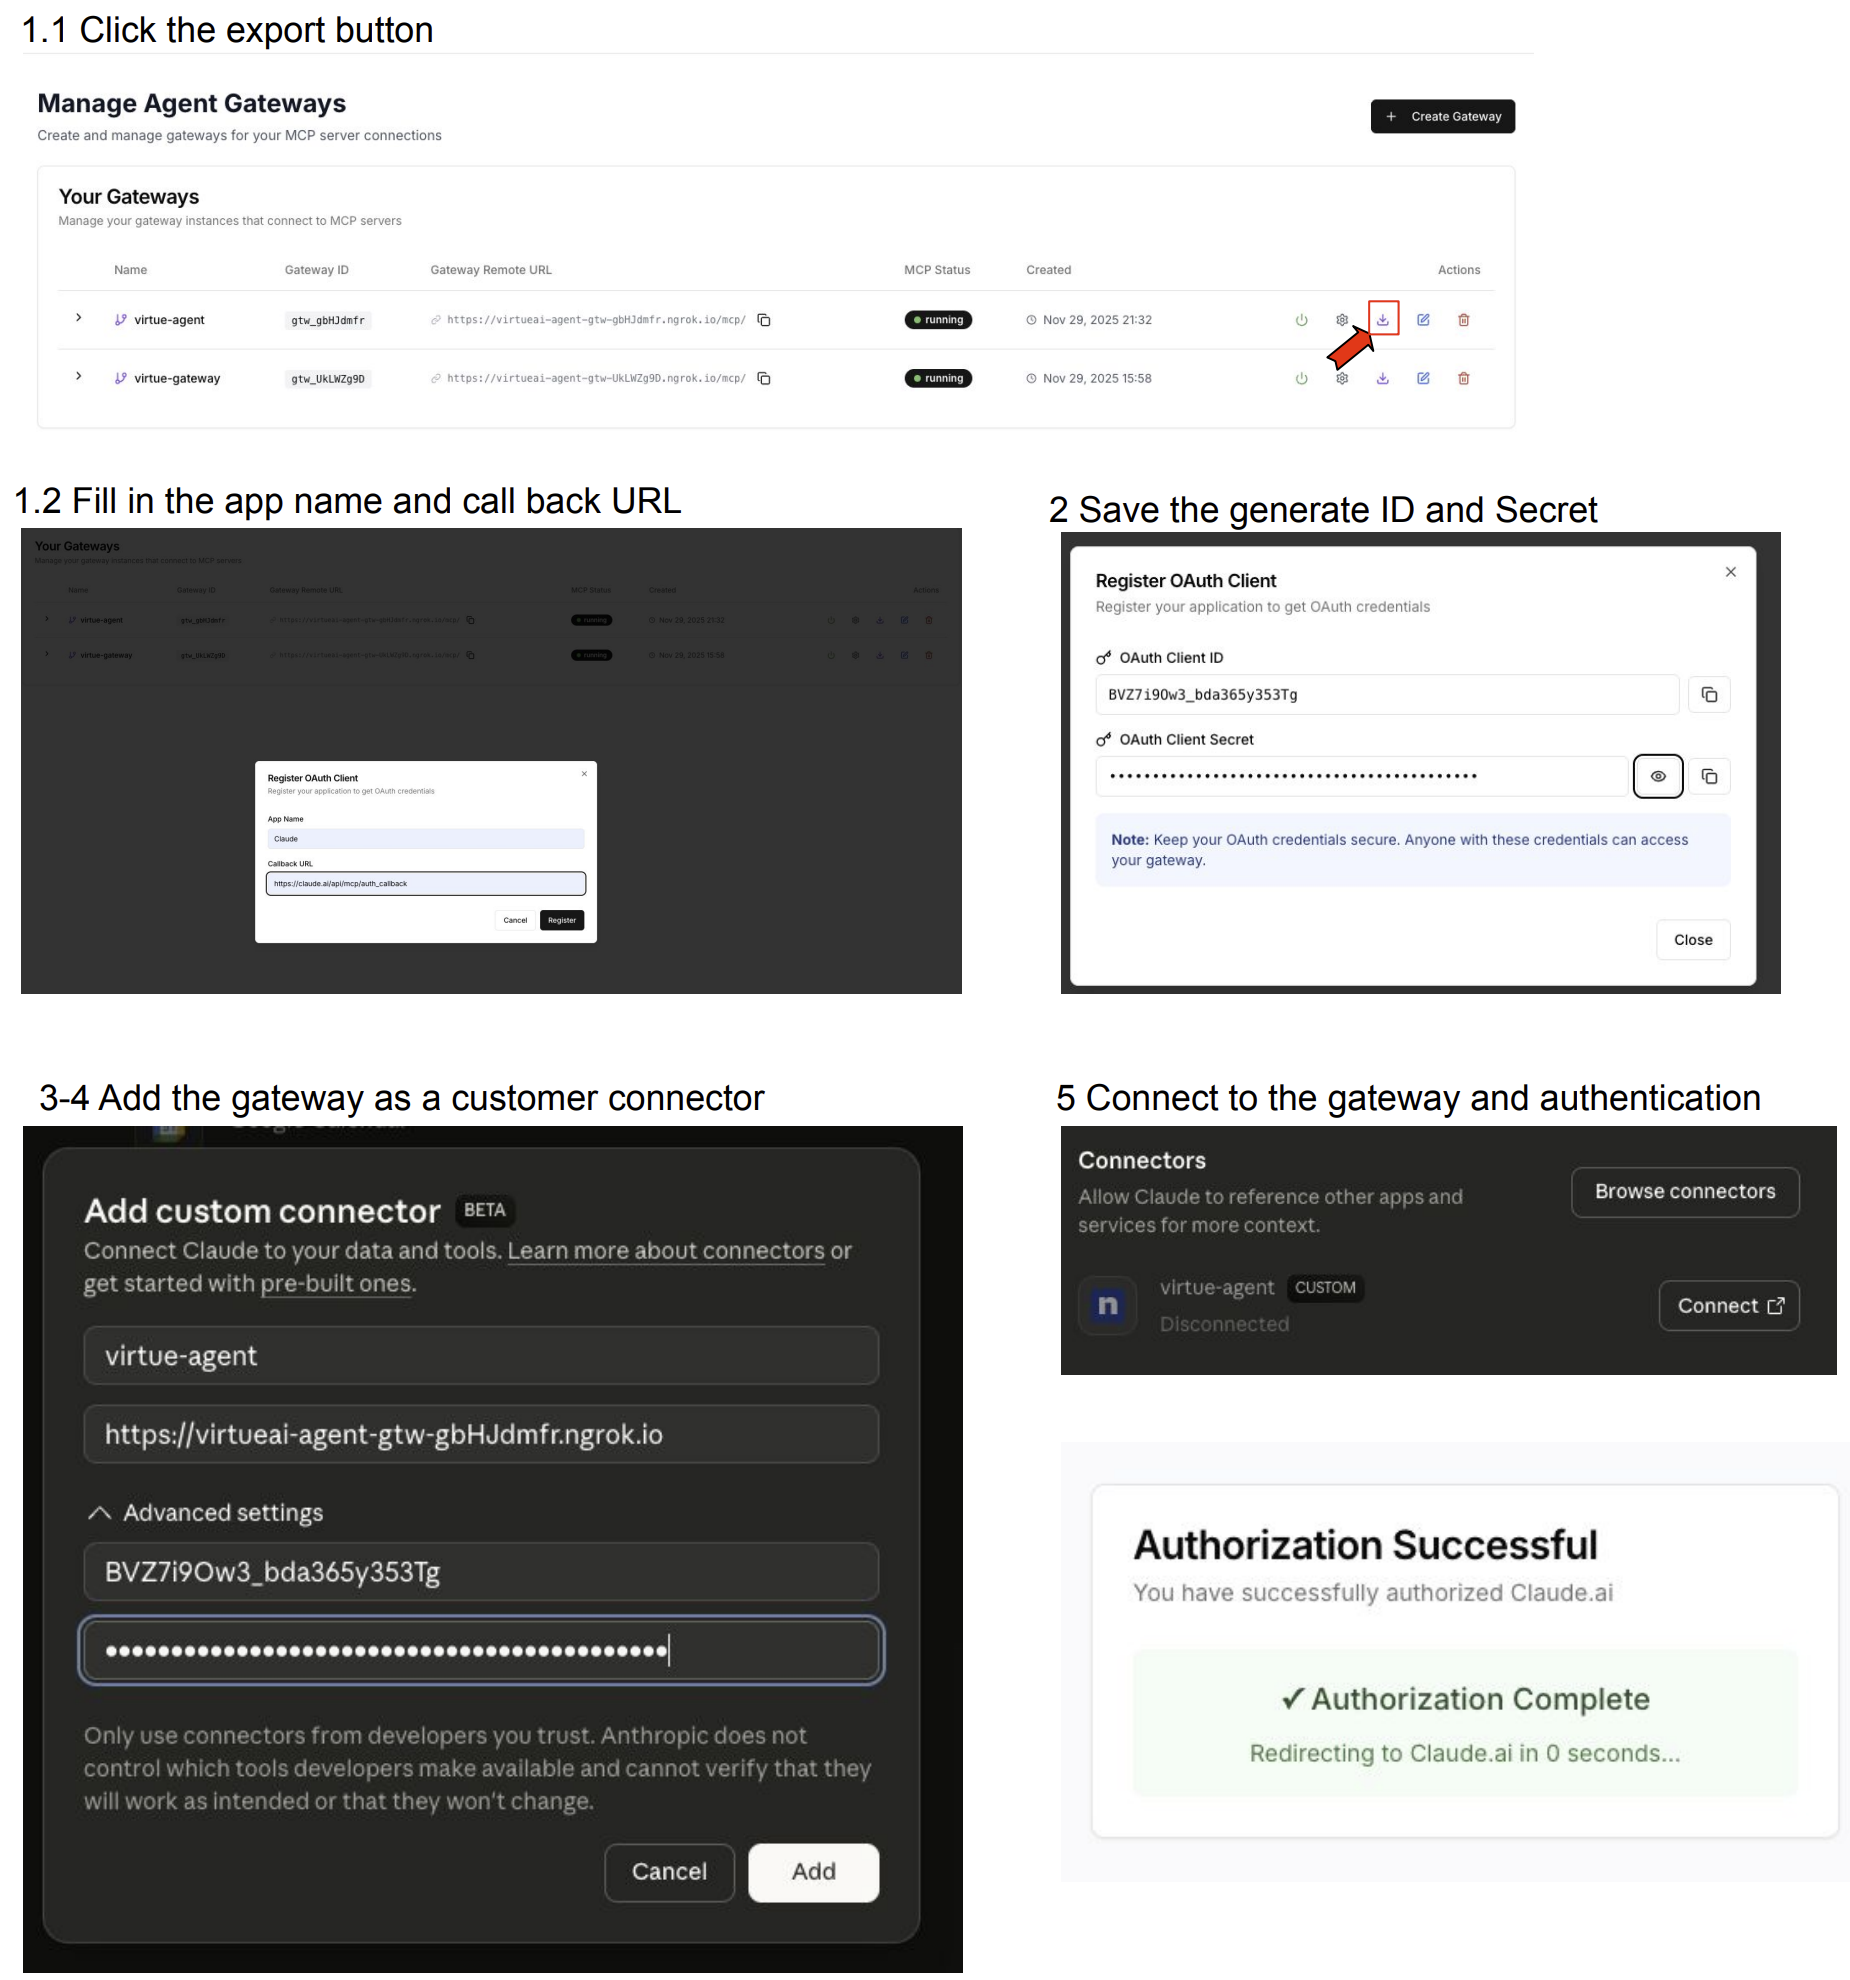
Connect Gateway to third-party agents
Once a Gateway is created, users can connect it to third-party agents for using the attached MCPs as well as the configured guardrail functions. We support both static registration and dynamic registration of the Gateway endpoints. Below, we use Anthropic as an example to demonstrate our connection method.
Static registration
- Click export button for the selected Gateway and type in the app name and callback URL
- Our platform will generate a client_id and client_secret, copy them and the gateway URL to a secure place
- Go to claude console, select connector, and add customer connector
- Fill in the name and URL of the gateway and in advanced settings, fill in the client_id and client_secret
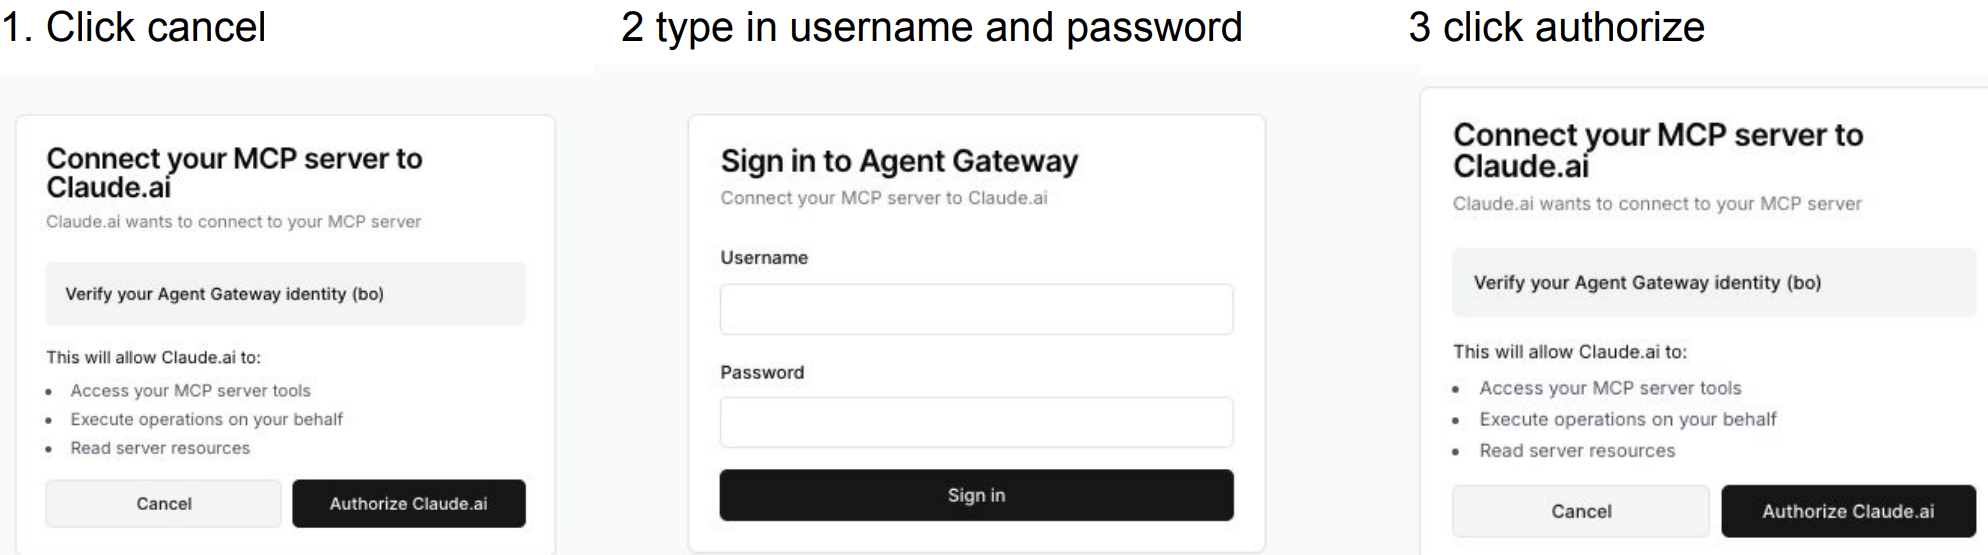
- After the gateway is added, click Connect when it is disconnected, it will jump to our authentication page. Log in with your username and password
- After authentication succeeds, you will be redirected back to the claude console. Open a new chat and enable the gateway, you will see and can use the tools of all MCPs connected to this gateway
Dynamic registration
- Copy the URL of the selected Gateway
- Go to claude console, select connector, and add customer connector
- Fill in the name and URL of the gateway; Here no need to configure the advanced setting
- After the gateway is added, click Connect when it is disconnected, it will jump to our authentication page. Log in with your username and password
- After authentication succeeds, you will be redirected back to the claude console. Open a new chat and enable the gateway, you will see and can use the tools of all MCPs connected to this gateway
Authentication
After jumping to the authentication page, you can click cancel to log in with your username and password again, or choose to use the auto authentication based on the saved cookie.
Important: For both static and dynamic registration, do not include
/mcpwhen filling in the url of the gateway.
Connect Gateway to Claude Code
Claude Code is Anthropic's terminal-based AI coding assistant that supports MCP server connections. You can connect your VirtueAgent Gateway to Claude Code to use your managed MCPs and guardrail features directly from the command line.
Prerequisites
- Claude Code installed on your machine
- A running VirtueAgent Gateway with attached MCP servers (status shows "Running" in the dashboard)
Step 1: Copy Gateway URL
- Navigate to the Gateway tab in the VirtueAgent dashboard
- Copy the URL of your running Gateway
Step 2: Add Gateway to Claude Code
Run the following command to add your VirtueAgent Gateway as an MCP server:
claude mcp add --transport http virtueagent-gateway https://your-gateway-url.virtueai.io/mcp
Step 3: Authenticate
When you start Claude Code and it attempts to connect to the gateway, you'll be prompted to authenticate:
- A browser window will open automatically for authentication
- Log in with your VirtueAgent username and password
- After successful authentication, you'll be redirected back and the connection will be established
Step 4: Verify the Connection
Start Claude Code and verify the gateway is connected:
claude
Once in the Claude Code session, run the /mcp command to check the connection status:
/mcp
You should see your gateway listed as connected and authenticated with all available tools:
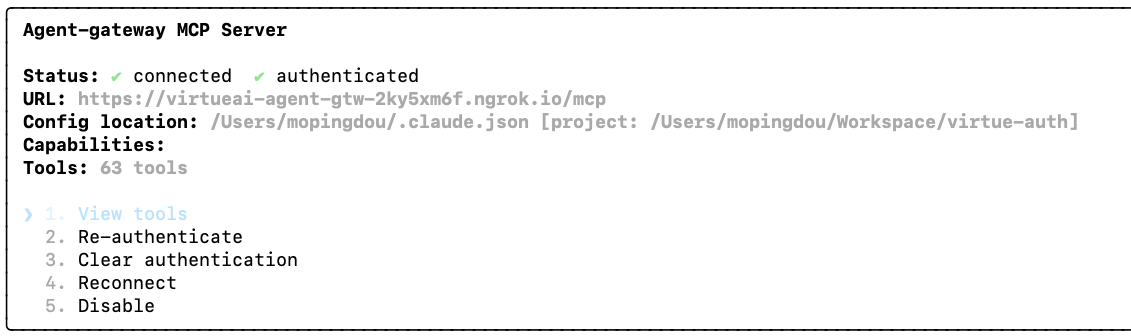
All tools from the MCPs attached to your gateway should now be available, along with the configured guardrail protections (Action Guard, Access Control).
Connect Gateway to GitHub Copilot (VS Code)
GitHub Copilot in VS Code supports MCP server connections via the Streamable HTTP transport. You can connect your VirtueAgent Gateway to GitHub Copilot to use your managed MCPs and guardrail features directly from VS Code.
Note: VS Code Copilot does not currently support automatic OAuth flows for MCP servers. Use an API Key for authentication instead.
Prerequisites
- VS Code with GitHub Copilot extension installed (VS Code 1.99 or later)
- A running VirtueAgent Gateway with attached MCP servers (status shows "Running" in the dashboard)
- An API Key created from the VirtueAgent dashboard
Step 1: Create an API Key
- Navigate to the VirtueAgent dashboard
- Create an API Key with the appropriate permissions for your gateway
- Copy the API Key to a secure place
Step 2: Copy Gateway URL
- Navigate to the Gateway tab in the VirtueAgent dashboard
- Copy the URL of your running Gateway
Step 3: Configure VS Code
Create a .vscode/mcp.json file in your project workspace:
{
  "inputs": [
    {
      "type": "promptString",
      "id": "gateway-api-key",
      "description": "VirtueAgent Gateway API Key",
      "password": true
    }
  ],
  "servers": {
    "virtueagent-gateway": {
      "type": "http",
      "url": "https://your-gateway-url.virtueai.io/mcp",
      "headers": {
        "X-API-Key": "${input:gateway-api-key}"
      }
    }
  }
}
Replace https://your-gateway-url.virtueai.io/mcp with your actual Gateway URL (include /mcp at the end).
Step 4: Authenticate
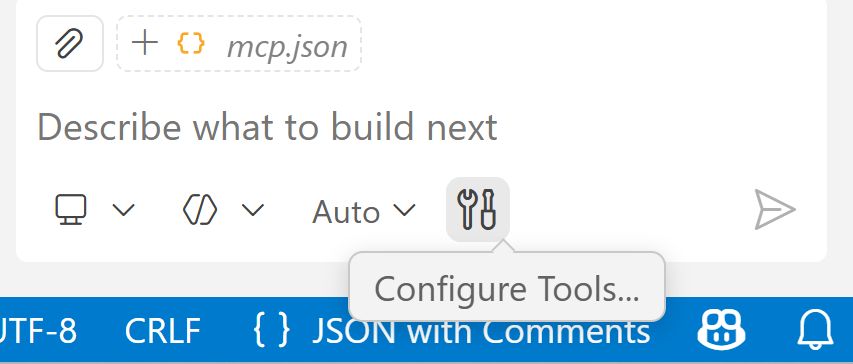
- Open VS Code and open the project with the
.vscode/mcp.jsonfile - When prompted, enter your API Key
- Click Configure Tool to complete the MCP server setup
Step 5: Verify the Connection
Open GitHub Copilot Chat and switch to Agent mode. You should see your gateway listed as connected with all available tools:
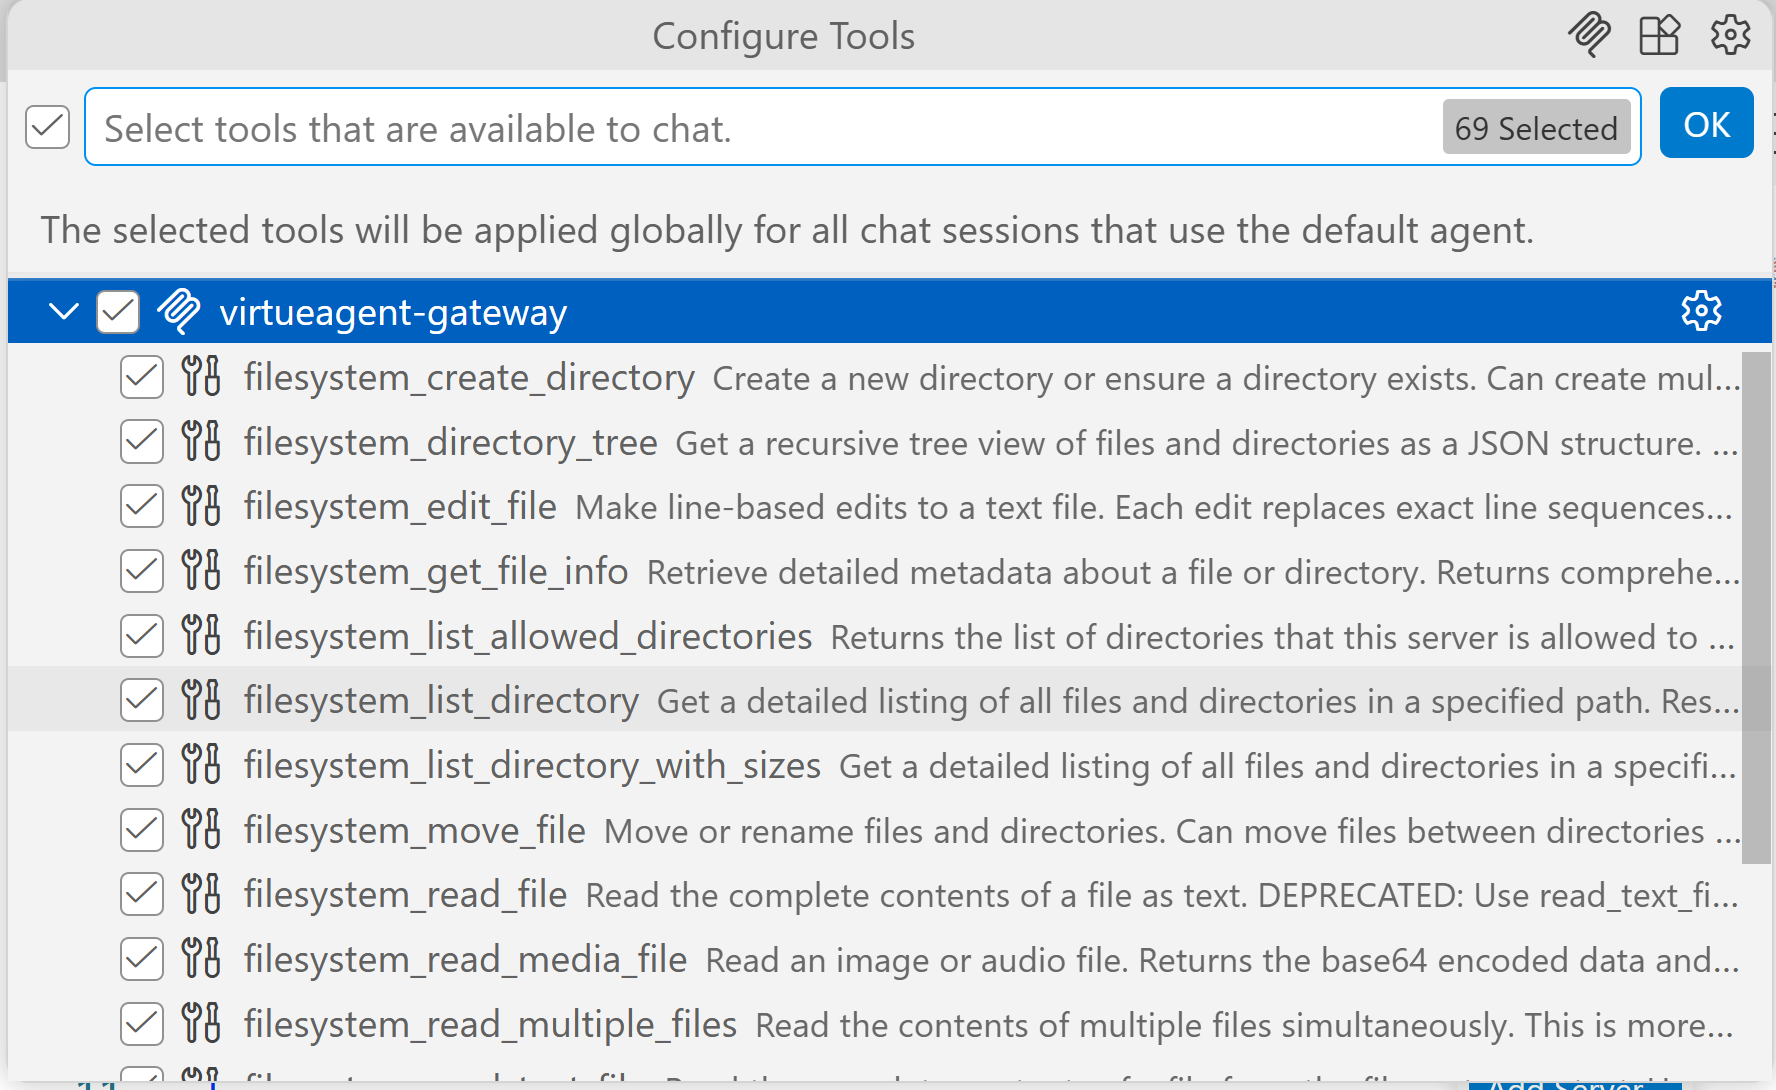
All tools from the MCPs attached to your gateway should now be available, along with the configured guardrail protections (Action Guard, Access Control).
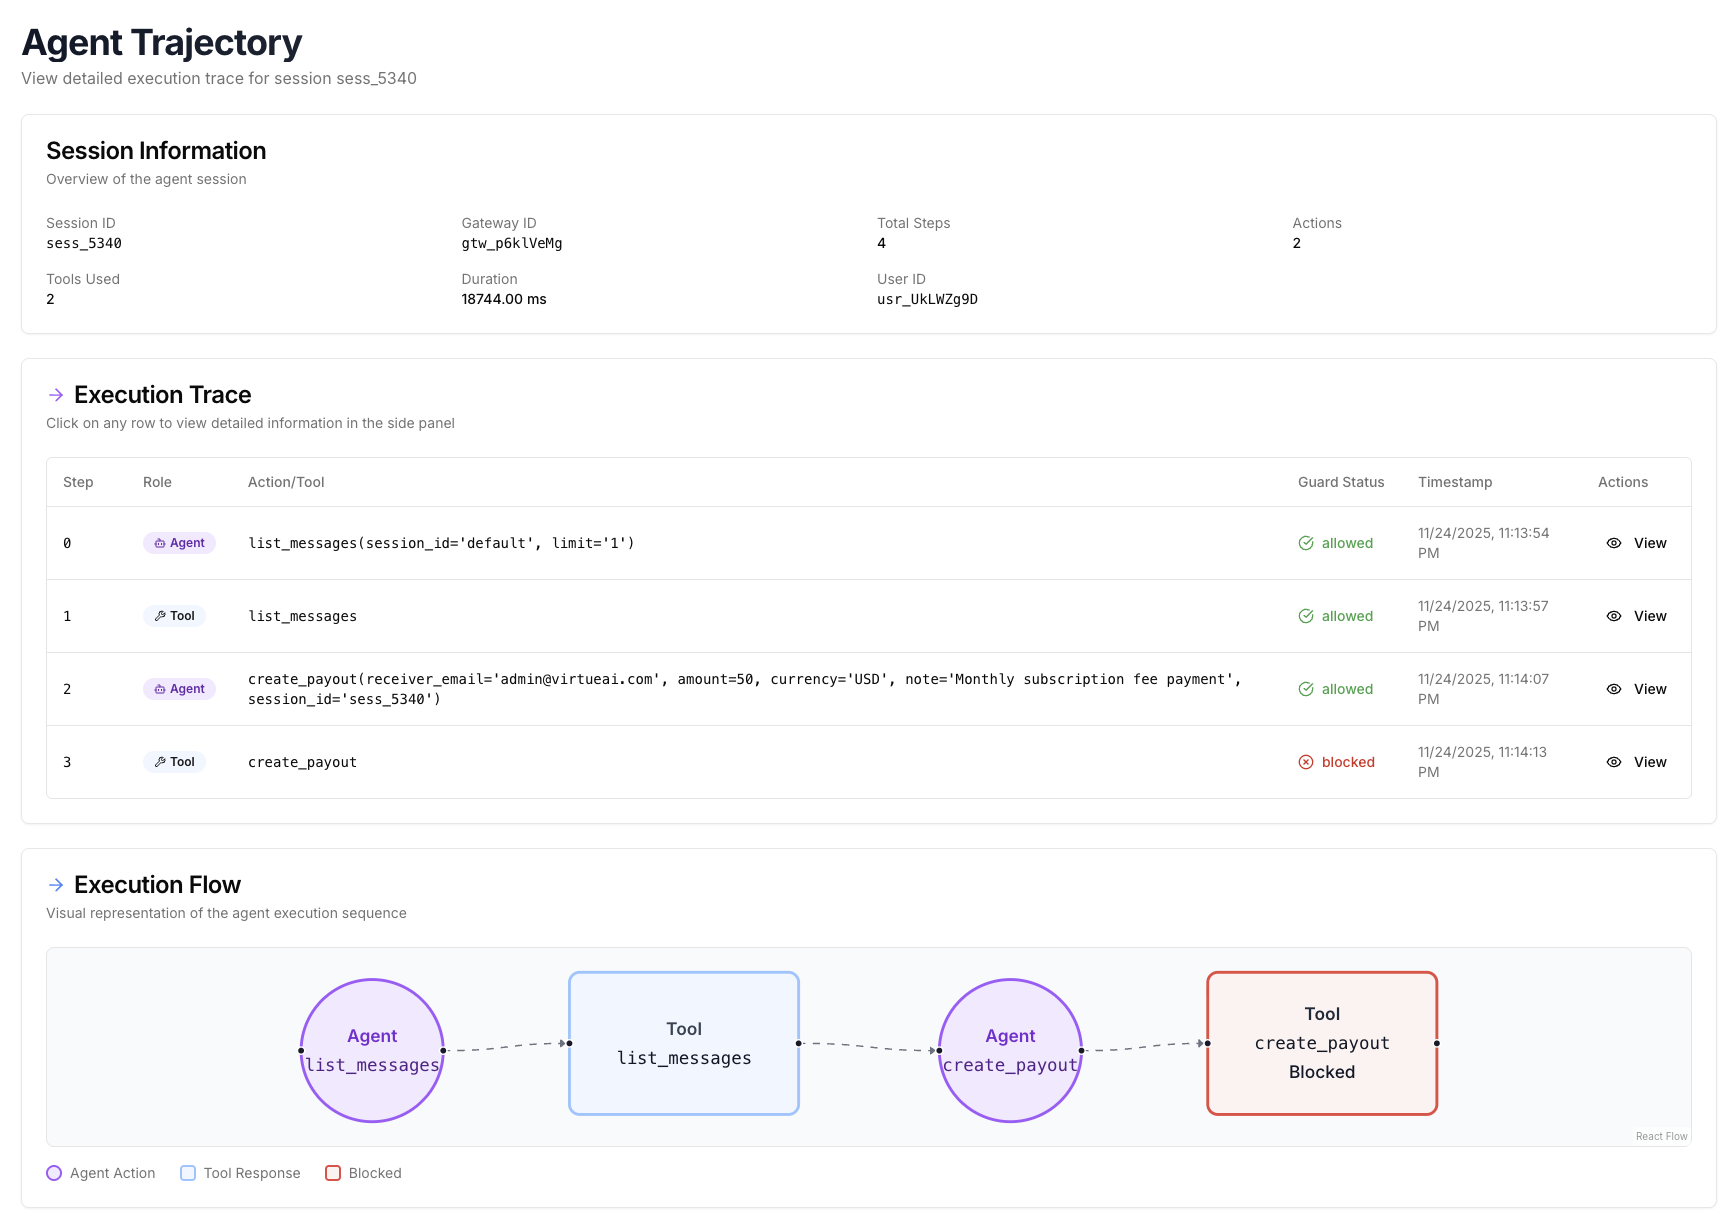
Observability
The action sequence of every agent trajectories (managed by gateway and sessions) can be found in the "Trajectories" tab. Each session means one conversation with the agent. By clicking on a session, user can see the detailed action sequence of that session, including the observations, actions, tool calls, and final responses. Clicking "View" can see the details of each action step. We also show the guardrail activities (from Action Guard) in the trajectories to demonstrate which actions are blocked.